I tried several times, but I just didn't like my handwriting. I wonder if other people hate their handwriting? My handwriting is not that bad, but I see ALL the imperfections and tend to write larger as I move down a paragraph..... Moving on ;) Isn't Carrie's Thankful sign above just SWEET?!?! I still plan on making one for me with all the wonderful things in my life listed for all to see!
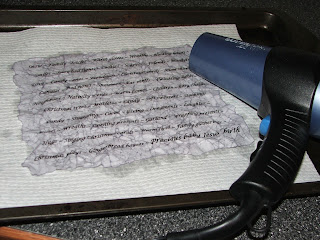
Well, back to my Christmas gifts. I finally decided that I was going to use the computer or I would never get these projects done. I printed my list of words that made me think of Christmas on a plain sheet of paper. Then I wadded and wrinkled the paper so it would soften and accept more dye later.
This next step can be done before or after you wad the paper. Take a straight edge and tear off extra paper to create a torn soft edge that will soak up the dye.
I found a package of black Rit dye in a drawer and mixed a tablespoon or two with water in a bread pan. I placed it in the bottom of the sink because....well....I tend to make a mes. I dipped the paper in the water for a few seconds and gently wrung the water out. The paper will dry several shades lighter so don't worry if you think it's too dark.
This step is tricky, because you now need to gently unwad the wet paper without tearing it up too much. Lets just say I had to do this step several times. Once your paper is flat lay it on a paper towel to absorb the extra water and let it air dry or if you are impatient like me gently use a blow dryer.
I used postal wrapping paper to be a backer for the dyed paper. I could have used a grocery bag, but the crease in the bag was going to show in the frame so I opted to spend a little extra since these were gifts.
I centered the dyed paper on the postal paper I cut to the size of the opening and glued them together.
After cleaning the glass I put the frame back together and went upstairs to get my Cricut. I cut out the word Christmas in vinyl and placed it in the center of my frame using the words behind as a guide.
This is the final product, now I need to make one for myself to put on the piano since these will be leaving my house soon!
.


No comments:
Post a Comment